
Whether you want to host a private stream for your family, friends, and most devoted fans, or just check the video and audio quality, a slew of streamers are looking for ways to do it on Twitch. Granted, with so many variables to consider, going live for the first time can be a nerve-wracking process.
In this article, we will be covering how to Stream privately on Twitch, Discord and even Youtube.
Method 1 – How to set up a Private Twitch Stream on your Alt Account
Because this ALT account has no followers or subscribers, no one will be notified that you’re broadcasting.
Here are some tips for keeping your Twitch feed as private as possible:
- Make an ALT account with a nondescript name.
- Start your private Twitch stream with no title, tag, or category.
- Give the link to whoever you want to privately stream to.
By adding no title or game category, you will not appear under any game directories and thus no one will be able to find your test or private streams.
This is the easiest method that doesn’t require any third party’s help and it works!
Method 2 – Test Your Stream With Twitch Inspector
Twitch Inspector allows you to analyze and assist in the troubleshooting of internet connection or encoder related issues while broadcasting to Twitch.
Step 1 – Login to Twitch Inspector
Head over to Twitch Inspector and click login with Twitch.

Step 2 – Run A Stream Test
Click on Run a stream test in the dashboard. A prompt will appear showing you how to get your stream key.

Head to your Twitch dashboard to get your stream key. Go to Creator Dashboard –> Settings –> Stream. Here you will see your stream key. Click on copy to copy the stream key.

In your streaming platform of choice (I use Streamlabs) paste your stream key in and add ?bandwidthtest=true to the end of the stream key.

Once you have done that you can now click on Go Live in your streaming platform.
Step 3 – Analyse Your Data
Head back into Twitch inspector and you will be able to see some useful information to check on the quality of your stream.
You want to see your bitrate as stable and if your playing video you will also be able to see your Framerate Average, Max and Min.

If everything is green and you have stable FPS and bitrate you should be ready to now stream live to Twitch.
Alternative Ways To Private Live Stream
Other private platforms that aren’t Twitch can be used to set up a private stream for your significant other, friends, or family.
A private Twitch stream, after all, isn’t really private.
Here are two hassle-free ways to truly private stream:
1. Private Livestream on Discord
You can share your entire screen or an application window on your own discord server or private call. You won’t have to worry about anyone uninvited being there.
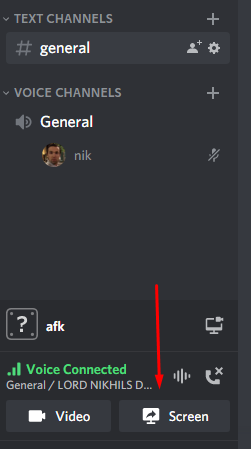
After joining the voice channel or call click on the Screen button as depicted in the image below.
A window will pop up. Choose the application you want to share, the best option in case you want to watch a video on a web browser along with sound, otherwise you may choose the screen you want to share and the sound will not be streamed to your viewers.
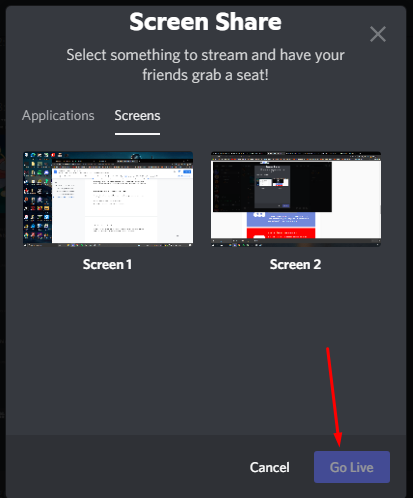
Hit Go Live and anyone in the Voice Channel or call with you will have the option to join your stream and watch.
2. Private Stream on Youtube
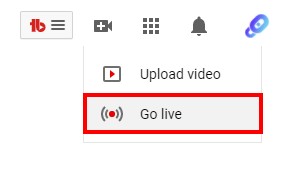
• Open YouTube & click on “Go live”
• Select “Right now”, then select “Built-in webcam”.
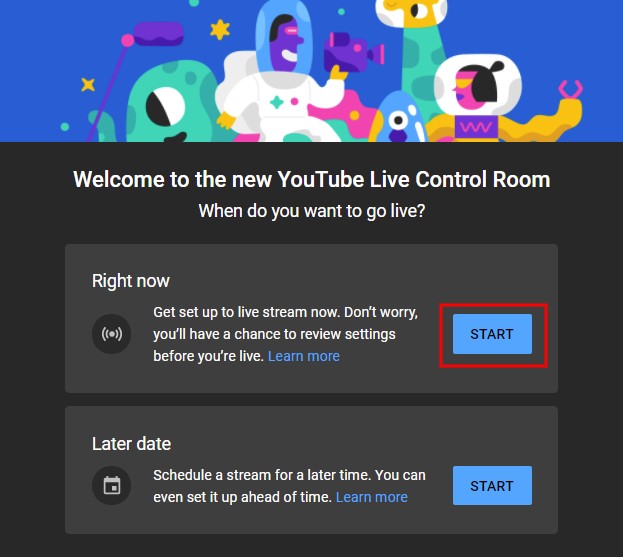
Select the right now option by clicking start.
After you’ve selected the “Right now” option, you’ll have to choose between a couple of stream types.
The first stream type is “Built-in webcam” while the second stream type is “Streaming software”.
If you want to stream using your webcam and microphone, select the “Built-in webcam” option.
However, if you want to live stream using streaming software like OBS, select the “Streaming software” option.
The next step will teach you how to change your live stream’s visibility to private.
• Click on the “Edit” button, then click on “Visibility”
Once you’ve chosen when you want to go live and your preferred type of stream, you’ll land on your live streaming dashboard. You’ll also see your stream settings, analytics, and stream health.
Click on the “Edit” button to edit your video’s information.
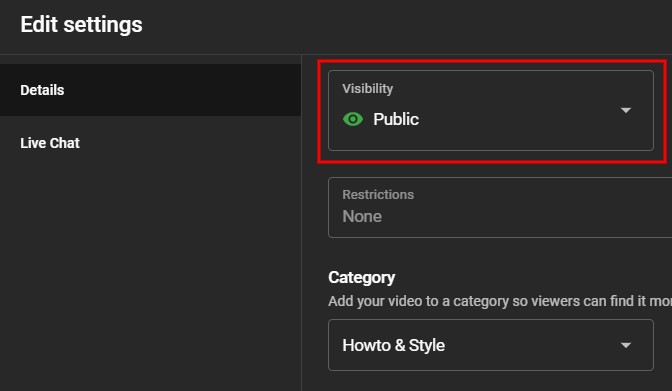
By default, the visibility is set to public. Click on it and choose the private option as shown below.

By choosing the share privately option, you will be able to invite people by inputting their email addresses.
You may also choose the unlisted option as it may be more convenient. Only those with the link of your live stream can join the stream and the stream is not listed or available anywhere in the library or recommendations of your viewers.
How to do a subscriber-only stream on Twitch
Twitch provides a plethora of incentives for content creators to encourage viewer subscriptions. Streamers can attract subscribers in a variety of ways, including subscriber-only chat mode and emotes.
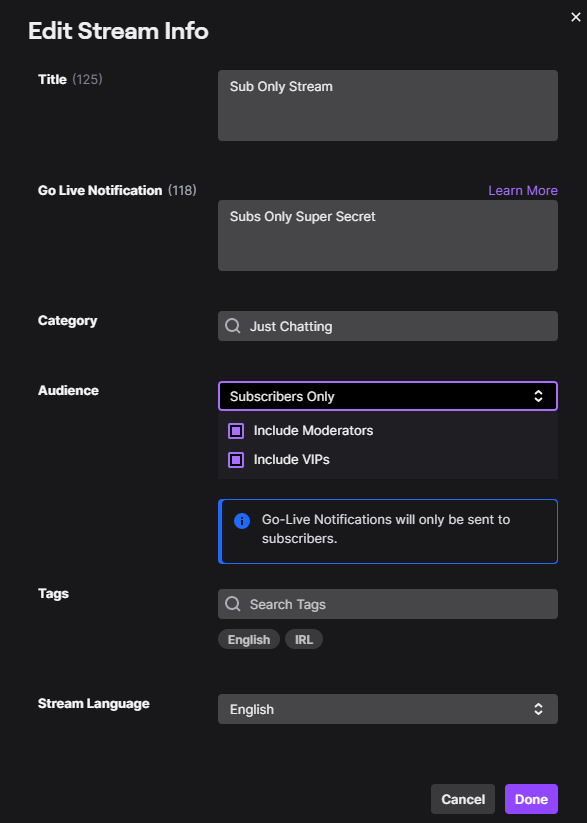
To change the setting of your broadcast to make it sub-only, you first need to go to your stream manager in Twitch and select the “Edit Stream Info” option under the “Quick Actions Tab.”

Once you click that button, a box will pop up in the middle of your screen. There is an option over there to edit your “Audience” over there. You can select whether you want to stream for everyone or just the subscribers supporting your stream.
Subscriber-only streams can be great for showing appreciation to your loyal supporters. Although doing them regularly and neglecting the rest of your audience is not the optimal way to grow your stream. It may also make you appear to be a sellout.
Conclusion
Streaming privately can be useful if you want to just stream for friends and family or even if you just want to checkout some new changes you have made to your stream. One of these methods should get the job done for you no matter what your reason for private streaming.
Read More From Get On Stream:


4 Comments
Hi there i am kavin, its my first occasion to commenting anywhere, when i read
this piece of writing i thought i could also create comment due to this sensible paragraph.
Hello Kavin! Welcome to the world of online commenting. It’s wonderful that you felt inspired by the content you read. Creating comments allows you to engage with others, share your thoughts, and contribute to the conversation. Feel free to express your insights and opinions—it’s a great way to connect with fellow readers. Happy commenting! 🌟🗨️
It’s enormous that you are getting thoughts from this paragraph as well as from our
dialogue made at this place.
Indeed, the exchange of ideas and perspectives enriches our understanding. The thoughts shared here contribute to a collective pool of knowledge. Let’s continue this dialogue, fostering growth and learning together! 🌟💬🤝